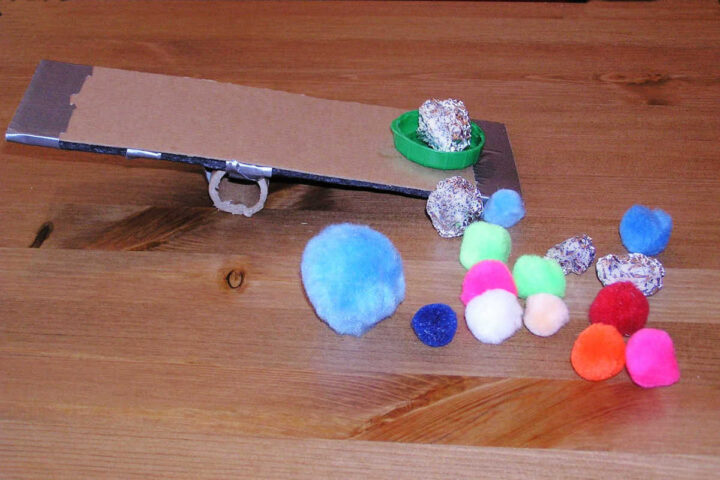
We have come up with the easiest diy catapult ever! It has no complicated levers or pulleys, no rubber bands that might accidentally snap into your nose and no plastic spoons to break in half. The instructions are so simple that kids can make the catapult all by themselves and you don't need any special skills or materials.
In addition, after you make your own catapult, you'll want an easy way to set up target practice to test your homemade catapult out. We've got you covered with a simple target game so get ready for hours of screen-free fun!

Catapult Instructions
You are so smart you can figure out how to make the catapult just from looking at the photo, but here are the instructions.
Materials Needed
- A 10 inch (or so) length of sturdy board. (See below for some options)
- Duct tape
- Sturdy tube. A flimsy paper roll tube will not work. Use a sturdy cardboard roll, or firm plastic tube. Your tube should not have any give.
- Large bottle cap
- Glue
- Soft items to launch such as pompoms, crumpled bits of foil, cotton balls, etc.
Step by Step
For the diy catapult board: You want something that will not bend at all. We had a piece of foam core board left over from a package and attached a length of cardboard with duct tape to the top of it.
Alternatively, you can tape several layers of cardboard together, or use a thin piece of plywood.
Cut your tube the width of your board. Tape it to the bottom of the board in the center.
Glue the bottle cap to the top of one end of the board.
How to Launch
Place a soft item (such as a pompom) into the bottle cap.
Count down from 10.
On zero, yell, "Blast off!!!" and with all your might, slap down on the end catapult without the cap.
Watch the pompom sail through the air. "Wheeeeeee!"
MORE: Simple machine play with a diy pulley
Catapult Target Game
Once your child has got the hang of their new toy and is catapulting objects all over the living room, take a moment to redirect their attention to some more structured target practice.
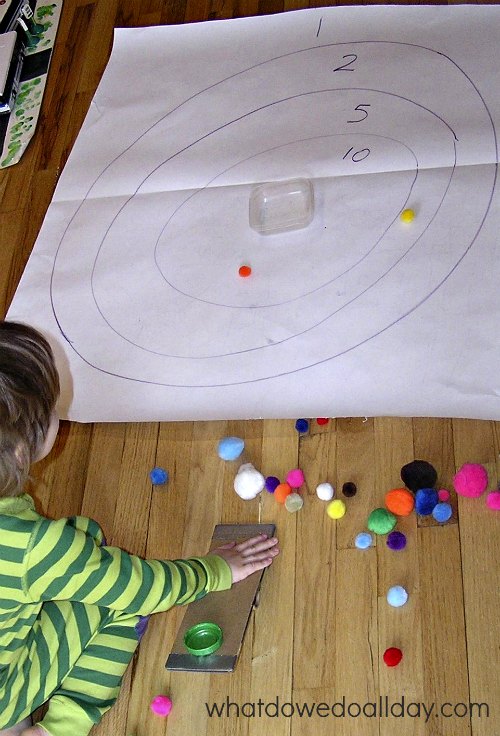
We set up this simple target game in no time with only two items. All you need is a large piece of paper and a pen. As you can see, the target doesn't need to be pretty.
Place a large piece of paper on the floor. A length from a roll of butcher paper is perfect. Next, draw concentric circles and write a point value in each one.
Optional: place a small container in the very center as the bullseye as we did. You can also just draw the bullseye, if you prefer.
Using the diy catapult, launch items, aiming for the center of the target. Depending on the landing spot, each successful launch is worth a point value.
Using this target, kids can simply make up their own rules.
Do they want to play until they reach certain point value? Or a predetermined number of rounds?
Your job as the parent is to sit back, cheer them on, and drink your coffee.
Enjoy!


Raising a Happy Child says
Love it - I was planning on making catapult next week since we'll be revisiting castles. This will be a nice extension 🙂
MaryAnne says
Very nice - beautifully simple, too =)
catb says
Ooh - love this idea. Will definitely try it out tonight. Thanks!
Joyful Learner says
Love this idea. Can you link it to our math links? It's a perfect math activity!
Phyllis says
Adding up points for any game is always a good way for the little ones to practice addition and subtraction without them even realizing it!
An Almost Unschooling Mom says
I love it! And, we already have the catapult, and pompoms on hand 🙂
Cathy at NurtureStore says
Great idea - so simple to set up, but great fun. We drew a target on the wall with chalk in the winter and used snowballs to throw. I wondered if you might come and share an idea with our Play Academy on Fridays? http://nurturestore.co.uk/tag/the-play-academy-2